|
CBM 1 2 3 4 5 6 7 |
|
CBM 1 2 3 4 5 6 7 |
| After finishing up the head and neck I
started working feverously on the arms of the cardborad man. Chapter
3 supplies photographs 13-25 of the Spring Break build and also
finishes up the first full day of production. CLICK ON THUMBNAILS FOR LARGER PICTURES IN A NEW WINDOW! |
|
|
|
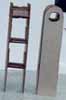
PHOTO 13-UpperArm.jpeg
I loved the fact that I had to make two of everything because I could take pictures like this one. It simultaniously shows a front view and a side view. The hole at the top will become one part of the intracate shoulder joint. |
|
|
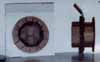
PHOTO 14-ShoulderJoint.jpeg
These were the rotational elements of the shoulder joint. The plane that they rotate on becomes the side of the Shoulder Box. Notice the excessive amounts of reinforcement tabs. |
|
|
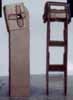
PHOTO 15-UpperArmwithJoint.jpeg
Now the upper arms have been jointed to the lifting part of the shoulder joint. This is a good detail of my hole and rod joint system. Do you see what 1 + 1 is going to be? |
|
|
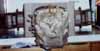
PHOTO 16-ShoulderBox.jpeg
Here I have attatched the front and back plate of the Shoulder Box. Eventually I hope to put the letters C B M across the chest plate (carved out of cardboard of course). This was an exciting step because he is starting to look like a person. |
|
|
PHOTO 17-ShoulderDone.jpeg
So here's the EXTREMELY complex shoulder joint. It gives the Cardboard Man rotational and up-down mobility. Is this getting complicated enough for you? |
|
|
PHOTO 18-ShoulderDoneTwo.jpeg
Even with his arms removed the Cardboard Man begins to show off. Here you see some of the possibilities of joints made out of cardboard. I was sitting there going "this is going to be pretty cool." |
|
|
PHOTO 19-ShoulderSide.jpeg
Here's a side view of the Shoulder Box before I added the shoulder joints. You can see how the neck works pretty well from this angle. |
|
|
PHOTO 20-ShouldersAttatched.jpeg
Ha Ha! The shoulders are done! Now the Shoulder Box is also complete. Standing him up on the upper arms was a good way to show how the joints can support the weight of the upper body. |
|
|
PHOTO 21-ShoulderMobility.jpeg
Then the arms rotate down. One of the types of mobility possible by the complex shoulder joint. The arms can also be lifted out to the sides. This photo also shows how I have left the elbow areas "open" so that I can design them as I go. |
|
|
PHOTO 22-ShoulderMobilityTwo.jpeg
Here is a good side view shot of the Shoulder Box. It also shows the shoulder joint pretty well. You can imagine the upper arm lifting towards you and then being able to rotate. |
|
|
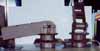
PHOTO 23-ShoulderBottom.jpeg
Here is a shot from underneath detailing the neck and shoulder joints from the inside. The four major support tabs for the Shoulder Box can also be seen. |
|
|
PHOTO 24-ShouldersTop.jpeg
And just for kicks here is the top view of the same thing. As you can tell from all the pictures I took, I was pretty excited about this step in the process. |
|
|
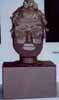
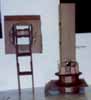
PHOTO 25-EndDayOne.jpeg
This is a picture of the Upper Body set on top of the Lower Body. They are NOT attatched at this point. I got to the end of the first day of Spring Break madness and wanted to get an idea of what I had accomplished. There are many steps to go, but you start to get the IDEA of what the CBM is going to become... |
|
CBM 1 2 3 4 5 6 7 |