|
CBM 1 2 3 4 5 6 7 |
|
CBM 1 2 3 4 5 6 7 |
| If you can believe it,
it took me a WHOLE day just to finish the arms and hands. There are
a lot of complicated joints in there! It didn't help that the hands by
themselves took me 5 hours. Chapter 4 supplies photographs 26-41 of
the Spring Break build. CLICK ON THUMBNAILS FOR LARGER PICTURES IN A NEW WINDOW! |
|
|
|
PHOTO 26-ElbowJoint.jpeg
Ahh! The newly constructed elbow joints are basking in the morning's sunlight. Note the flaps that will allow it to connect to the sides of the Upper Arm. This joint is a variation on the neck joint, but with vertical strips of cardboard to prevent slipping instead of horizontal rings. |
|
|
PHOTO 27-ElbowsAttatched.jpeg
Here the Elbow Joints have been attatched. They work essentially like the shoulder joints. So at this point they just have rotational mobility. The up-down mobility will come soon. |
|
|
PHOTO 28-ElbowsDisplayed.jpeg
This side view show exactly how the Elbow Joints were attatched. You can also see the strips of cardboard on the rotational cylinder. That was an idea I came up with to keep the Forearm from pulling out of the joint. I use it later on the Wrist Joint as well. |
|
|
PHOTO 29-ForeArms.jpeg
Did I lift this photo from the Upper Arms? No. But they are almost identical (except for the length). I definitely knew what I was doing by this point though. I think I cranked these out in an hour or so. |
|
|
PHOTO 30-ForeArmsAttatched.jpeg
Wooo hooo! Here the Forearms have been attatched and the CBM is relly coming together. This photo illustrates the rotational mobility because of the horizontal/vertical difference between the right and left Forearms. It also shows the up-down mobility because neither of the Arms is straight. They are both bent at the Elbow. |
|
|
PHOTO 31-ThePieces.jpeg
Here is a miscellanious shot of the pieces thus far. You can see how the Forearms of the CBM are bent down and the Legs are bent at the Knees as well. This was another big moment. All that remained were the Hands and the connection between the Upper Body and the Lower Body. |
|
|
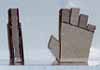
PHOTO 32-HandsOne.jpeg
They don't look like much, but just getting to this photo took some serious doing. I had to take an INSANE number of measurements to get the hands to work out. These are the Palms and the Fingers up to the Middle Knuckle. There is a lot of bracing underneath the surface so the Hands are strong. |
|
|
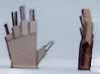
PHOTO 33-HandsTwo.jpeg
The picture didn't turn out too great but these were the second half of the Fingers. The Thumb of the Left Hand shows it pretty well. There are basically two cardboard runners which I then faced for the Fingers. |
|
|
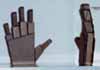
PHOTO 34-HandsThree.jpeg
Here the runners have been covered and tipped. The side view shows how the Fingers curve in slightly so that the Hands are in a relaxed state and not too rigid. |
|
|
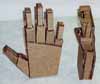
PHOTO 35-HandsCloseUp.jpeg
Of all the parts of the CBM, the Hands are the parts that I am the most proud of. All in all they took me 5 hours to do. Also some of the most complex gluing challenges came up during the Hands construction. The CBMs hands match mine EXACTLY though. Pfew! |
|
|
PHOTO 36-WristRod.jpeg
I kind of made this up as I went. I knew I wanted the Hands to rotate on some sort of Rod. I wasn't sure where it was going to go though. Things worked out pretty well actually... |
|
|
PHOTO 37-WristSlots.jpeg
So I attatched a flap of cardboard across the bottom of the Forearms. Then I made a hole in it AND in the support "beam" above it. I put the hole in the beam without drawing it out first. It was one of the best moves I made though, as you can see in the next photo. |
|
|
PHOTO 38-RodsInWristSlots.jpeg
Here I have slipped the Hand with a Rod into the provided holes. The second hole in the support beam acts to stabilize the whole wrist rod. So essentially the Hands are supported all the way up the Forearm. I was pretty proud of that little manuvere. |
|
|
PHOTO 39-HandsAttatched.jpeg
The title of this image is actually decieving. The Hands are INSERTED in this photo, but not ATTATCHED yet. When I attatched the Hands I put cardboard strips on the Rods to keep the hands from sliding out of the Wrist Joint (similar to the Elbow Joint mechanism). Anyways--the REAL point of this picture is that the Fucking Cardboard Man has HANDS now!!! I was really freaking out at this point. |
|
|
PHOTO 40-HandMobility.jpeg
Now the Hands are REALLY attatched. You can see the strips of cardboard just above the Wrist Joint. I should have rotated one of the Hands in this photo to actually show off the mobility of the Hands, but I think you get the point. The Wrist joint is not a compound joint because it only rotates. |
|
|
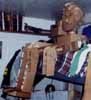
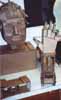
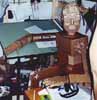
PHOTO 41-EndDayTwo.jpeg
I love this picture. The Cardboard Man is just showing off. You'll note that his Right Arm is resting on an INCLINED drafting table. So there are some pretty serious angles that he's tackling there. Also the Left Arm shows the mobility that is possible. The Shoulder Joint is both rotated and lifted up, as is the Elbow Joint. The Wrist is rotated slightly so that the CBM's Hand can sit level on the table. Woo! NOTE: Again, I just wanted to see all the pieces because I was done for the day. The Upper Body is NOT connected to the Lower Body in this shot. It is just resting on top of it. |
|
CBM 1 2 3 4 5 6 7 |