|
CBM 1 2 3 4 5 6 7 |
|
CBM 1 2 3 4 5 6 7 |
| My junior year of
college I canceled all of my plans for Spring Break so that I could
spend time with my girlfriend, Kate. Then a few days before it
started we broke up. Needless to say, I had a lot of excess negative
energy. I needed to focus that energy somewhere or I was going to
freak out. So I decided that I would lock myself in my room from 8am
to 10pm every day/night that week until the Cardboard Man was complete.
Chapter 2 supplies photographs 1-12 of the infamous Spring Break
build. CLICK ON THUMBNAILS FOR LARGER PICTURES IN A NEW WINDOW! |
|
|
|
PHOTO 01-BackHead.jpeg
This is basically the structure of the back of the head which I had built onto the THEA 222 mask (see CHAPTER 1). This had been the last part of the Cardboard Man that I had been working on, so I picked up where I had left off. |
|
|
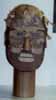
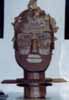
PHOTO 02-Face.jpeg
This photo shows the Cardboard Man's new FULLY cardboard face. The glowing red and yellow eyes were gouged out and replaced with cardboard ones. He was also supplied with a neck. |
|
|
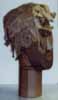
PHOTO 03-HeadwithHair.jpeg
This is a 3/4 view to show off the depth of the head. This was after I finished adding the rest of his hair. I received the most number of HOT GLUE BURNS during the hair installment process. Brown paper bags are THIN and conduct heat very well. |
|
|
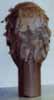
PHOTO 04-BackHeadHair.jpeg
This is a detail shot of the back of the head. Look at all that brown paper bag hair. Woo! |
|
|
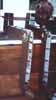
PHOTO 05-LegsSitting.jpeg
This is a good detail of where the legs were when I started Spring Break 2001. I had just added the TOP joint on the legs and began to figure out how I was going to attatch the body to the top of the legs. I think the head is just in there for kicks. |
|
|
PHOTO 06-LegsStanding.jpeg
Here the legs are standing against my Rat Pack poster that Alex Tuttle gave me for my birthday. I think I had done another drawing (see CHAPTER 7) at this point, so I knew the direction I was going with the hip attatchments. These two boxes connected the tops of the legs to the rest of the body. |
|
|
PHOTO 07-WaistOne.jpeg
Okay--here we go. The hips were pretty much done and then I added the "mega-cylinder" which eventually (three days later) becomes the central pivot point between the upper body and the lower body. The "waist" if you will. |
|
|
PHOTO 08-WaistTwo.jpeg
So at this point the lower body is "done" and the upper body has that weird box looking thing. It's basically a big platform that the rest of the upper body will rest on. It pivots around the giant cylinder. |
|
|
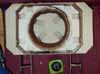
PHOTO 09-WaistOverhead.jpeg
Here is a great overhead shot of the Waist Joint. So the upper body platform rotates around the mega-cylinder. It's easier to see in this view. Look at all those reinforcement tabs! |
|
|
PHOTO 10-NeckJoint.jpeg
So then I decided I was DONE with that lower body stuff and went right back up to the top. I installed two rings to keep the head within a one inch vertical plane. This board acts as the neck joint and also becomes the top of the infamous Shoulder Box. |
|
|
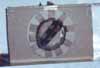
PHOTO 11-NeckBottom.jpeg
This is a view from underneath the neck. You can see the support rings jutting into the CBM's neck. It's really hard to describe exactly what I did here. But I'll say this: it's REALLY STRONG. To this day you can still safely lift the Cardboard Man by grabbing his HEAD. You can actually see all the way to the top of the CBM's head from this view. |
|
|
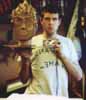
PHOTO 12-CompairingHeads.jpeg
This is an important shot for two reasons: 1) It compares the size of my head and the CBM's head. Sure, his is a little bigger, but it's pretty close. The CBM is about two inches taller than me and you are looking at it right there. 2) It shows ME at the BEGINNING of the week. You'll note that I look CLEAN, WELL-FED and SHAVED. Oh what a difference a week makes.... |
|
CBM 1 2 3 4 5 6 7 |